Back to Basics

Exploring the FamilySearch Catalog

One of the top websites for doing family history is FamilySearch. They have an amazing amount of records available on their website for all over the United States and the world.

Right now is a very interesting time in using FamilySearch because they are changing up the way that they have records. Many of the records that FamilySearch has are contained on microfilms that are only available for viewing in select family history libraries or centers by using a microfilm reader or scanner. That method can be inconvenient for people who are not near a family history center or could not order the film to their family history center. About a year ago, FamilySearch announced that they were no longer making microfilms and would be focusing on digitizing the records, another method of making records available that they had been utilizing. By digitizing the records, it would make them much more accessible to the general public. Some of these records are digitized and free to use, some are only viewable in a family history center, and others have not yet made it into the digital world yet, so it’s just a matter of understanding the website to know what’s up with the records you want. I’ll get more into that after some more lead in.

There are multiple places to look for records on FamilySearch. One of the big ones is “Records,” but another one that I am especially fond of is the Catalog. The Catalog is a great place to see records that are specific to small jurisdictions and to find records that haven’t been indexed. It can also bring up family histories.

A great way to  see if there are any compiled sources on your family is to search their last name under the “Surname,” “Title,” and “Keyword,” functions. A word of caution, though: make sure it’s actually your family branch and not some people with the same last name who are off in Massachusetts instead of Maine, where you need to be researching.

The most common way that I use the catalog is by searching Locality. Doing a locality search goes back to the family history rule of searching all jurisdictions. I usually try to start with the most important jurisdiction for the area in which I’m researching, which is different. For example, if I was researching the Midwestern United States, I would search with the county as the smallest jurisdictional level, because it is likely to have the most relevant and highest quantity of records for me (i.e. Montcalm, Michigan, United States). If I was researching in England, I would go down to the parish level (i.e. Watford, Hertfordshire, England).

After searching for a locality, a bunch of options are going to come up that list the records that FamilySearch has tagged under that locality. Like this:

catalog search

From there you can select record type and delve in to the actual records themselves. For example, if I click on Vital Records, then four options come up and I can click the link to “Record of Marriages, 1851-1936” to see the availability of the records. There will be a list of the divided up films (organized under film numbers) that you could potentially look at. And that’s where we get into understanding the new changes in FamilySearch and their digitization. There are four symbols you need to know when looking at the Catalog. They are:

FS camFS filmFS lockFS mag

The camera means that the film is digitized online and you can click the camera to view the images. The reel means that it is not yet digitized and you have to find the physical film. The camera with a key over it means that you have to view the digitized images at a family history center. (Once you’re at the family history center, it won’t have the key above it.) The magnifying glass means that at least some of the records (not necessarily all) have been indexed and you can search it.

Okay. Wow. Long blog post and I hope it makes sense. The FamilySearch Catalog is such an important resource to know how to use in your family history research. Before I go, I feel like this post is just a sad block of text with black and white pictures so here is some color!

Sunset

Back to Basics · tips and tricks

Busy, Busy, and No Time to Waste

This semester has been one of the craziest of my life. I have taken four family history classes (in addition to a history capstone class) and each of these classes has a final project that requires around 50 hours of research and several written report. It’s been pretty busy, especially as we are winding down to the end of the semester when all of the projects are due. Whether you are a student, casual hobbyist, or professional genealogist, life can be extremely crazy. As one of my professors likes to say, we have to fit genealogy into our lives because it’s not just going to happen. Well, all the chaos of life makes efficiency and time management all the more important.

One of my classes is a seminar on professional research in which we learn about what it’s like to be a professional in the genealogy world. There are a lot of options, but one of the big ones that a lot of students want to go into is client research, where someone asks you to do research for them and you do it and provide reports, etc. This is the background in which I learned a lot about efficiency in research, but it can apply to all kinds of research.

I am a perfect example of someone who is stricken with “Oh Shiny” syndrome (a name my professor likes to call it). I’m doing dedicated census research and suddenly I see this really cool fact (like a child previous unaccounted for) and, voila, I’m in vital records trying to find more records of this child, when they were born, and when they died. And about thirty minutes later I suddenly remember I was doing a census survey. Oops.

Now I am a firm believer that this is not always a problem, because it can lead to good discoveries, but it can also distract us from important research.

Thus, efficiency and time management.

I consider my mind to be an addled mess most of the time. So a wonderful tool for me to use is a to-do list. Yes, there is nothing more satisfying to me than putting a check mark next to an item on my list. I attended a fantastic lecture at RootsTech by Thomas Macentee who talked all about Research Checklists. There are multiple ways that you can do it, but basically, you list out all of the relevant record types for the time and place that your family is living in and it gives you a little bit of guidance as to where your time should be spent.

Another thing I like to do is, when I’m sitting down to do a session of research, I make a list of record types or places that I am going to search and what it is I’m looking for. Then I have small goals that can help me reach my bigger goals of the research.

You also will probably have to try and cure that “Oh Shiny” syndrome. This is where research logs (see that blog post!) and notes can come in handy. Because you now have a record of the information that you found and where you found it so you can go back and look at it later.

Basically, I want you to know that there are lots of different ways that you can manage your time. Find a way that you can do this yourself because, in the end, it makes your life better.

A final note about research logs: I know in a past blog post, I stressed the importance of blog posts. I just want to put in another plug for them because in one of my classes I got really behind on my research log (as in I stopped putting stuff in it completely…) and it is really biting me now. I can’t remember if I have searched databases or for certain pieces of information and so I feel like I’m going in circles. So do research logs!! Because it will help you so much with your efficiency and overall genealogy happiness.

Back to Basics

The Importance of Research Logs

Oh my goodness, guys, seriously. Research logs are the BEST. I’m not gonna lie, when I first started out my family history journey, I was so annoyed by using research logs because it seems like such an annoying, extra step that in the end would be a waste of my time.

Guess what? I was wrong.

Research logs are the bomb!

By logging all of the searches that you have done, you can make sure not to repeat any searches you have previously made and you can have information at the ready to help with later searches.

There are several different ways you can do a research log. There are programs like Research Ties (that you must pay for by the way) that can allow you to make a research log. RootsMagic also has a research log function. You can also go a little bit more simple and use Excel or a table in Word. Here’s an example of how I usually do my research logs in Word:

Sam Kendall Log Pic


Regardless of how you decide to create your research log, there are a few things that are necessary for a research log. These are: date, search parameters, which repositories you were searching, your findings (and I recommend getting really detailed here), and citations.

One of the huge things that we have been talking about in my family history classes so far this semester is the idea of analyzing and correlating information from the records that you find. Analyzing the information is basically pulling out all of the relevant information that you can from a document (and sometimes there is more important information in documents than you think there is). Correlating information is tying that information back into the information that you already have. Like making sure that the marriage record you found could be your ancestors based on information you’ve already found in birth records, censuses, and locality research.

Research logs are a great place to do your analyzing–you can put that right in your “Findings” tab. And it is the beginnings of correlation too because you are writing the information into your research log, you are automatically going to start correlating as well as when writing research reports or correlating information for further searches, the information is already right there.

Even though I think research logs are the best, I admit that sometimes I am still really bad at them. I just get going on a research question  with my family and soon I’ve done a million different searches and I have no idea which were good and which led to nothing. So. Together we can work on slowing down a little bit. Enjoy the small details. And we will thank ourselves later.

Back to Basics · tips and tricks

Making Hard Research Easier

A few blog posts ago, I mentioned the FamilySearch Research Wiki and realized that some of you may not know what that is or how you can use it. Pretty much, it will make your research easier by narrowing down what and how to search for records.

The Wiki is available on familysearch.org. Just hover over Search and select Wiki. It is a page that can be edited by anyone, but is monitored by FamilySearch. This is one of the great ways that you can find out what kinds of records are available for the locality that you are searching. It also has tips for areas of research and where to find the types of records that you are looking for.

One of the main ways that I have used the Wiki is to see when vital records were standardized or required for a specific state or county. Because it varies all over the United States (and, I’m assuming, other countries). For example, I had an ancestor that I was researching who died in 1898 in Morgan County, Utah. By looking on the Wiki, I found that death records for Morgan county are available from 1904-1964. So too late for my guy. But it also gives me research hints for pre-1904 and substitutes like the 1870 Mortality schedule.

If you are searching for information on research in a specific area, I recommend that when you are searching the place you add the word “genealogy” after the locality. It will help make sure you get to the correct page. I.e. “Morgan County, Utah Genealogy”

There are lots of other cool kinds of things on here besides just research help. For example, have you ever wanted to conduct an oral interview with one of your relatives to make sure that their stories stick around? The wiki has a page on how to conduct a good oral history interview with some possible questions you could ask and proper protocol.

There’s a page that will help you start writing your personal and family history (something I am a huuuuuggggeeee advocate of thanks to my class last semester). It will help you out with prompts and topics if you are having a hard time starting it up.

The next time you are starting on a research project, go check out the Wiki before you start doing endless searches. It could save you some time if you know that the records don’t exist then so you have to find an alternate way of learning that information.

tips and tricks

Details Written in Stone


20170514_171146

“Why do you think people decided to carve dead people’s names in rock and put it over where they’re buried?”

My cousin asked me this the other day when we were walking through a cemetery. (That sounds creepy, I know, but we were visiting my grandpa’s grave and then decided to look around.)

I responded to her, “I don’t know, but I’m so glad that they did!”

And, boy, am I grateful. I have hinted in the past at the fact that records aren’t always available for everything everywhere all the time. Or in the case of some research you simply can’t get a hold of the records because they are in another state or country. Well, at least for death, all hope is not lost! Because waaaayyyyy back in time, someone thought it would be a good idea to carve dead people’s names in rock and put it over where they’re buried.

There’s this new fad that has been going on for a few years in the family history community and that is taking pictures of gravestones. Yes! People go to cemeteries and take pictures of gravestones and upload them onto the internet. But it’s fantastic! It allows people all over the world to find the gravestones of their ancestors and, in some cases, get vital information. The photo above is a picture I took of a gravestone to see if I was related to those people we had just stumbled across in the cemetery.

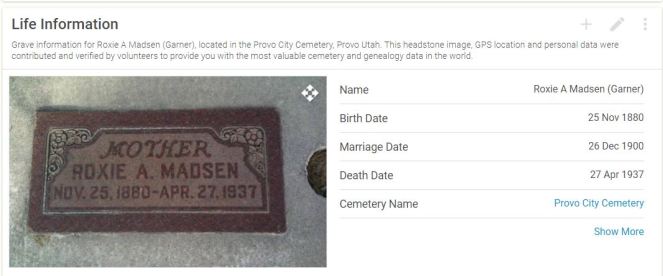
There are two major sites for the uploading and finding of graves in family history. One is Find a Grave and the other is Billion Graves. Both of them can be edited by community contributors. This allows people to add pictures and information about the people who are on the gravestone. Here is an example of a Find a Grave entry:

findagrave

And here is an example of a Billion Graves page:

billiongraves

With Billion Graves, you have to create an account to access most of the goodies. But they have a free option, so no problem there except for maybe even more genealogy emails in your inbox than you already have. There’s a lot more on both of these sites than I have in the screenshots, so go check them out!

So what kind of information can you find on a gravestone?

Well, as you can see in the above images, they have birth and death dates. Not all gravestones will have birth dates and not all of the dates on the stones will be as specific as Roxie’s (as you can see, the gravestone for LeRoy just shows a year). You can also get relationships from gravestones, if other names are listed (and if you’re really lucky, the stone will tell you how they are related). Sometimes on the back, it will list children or spouses, if it doesn’t list them on the front.

While gravestones may not be as exciting as a death certificate, they are a good replacement. I encourage you to still look for other sources to back up or, even, contradict what is on the stone that you find. But if you don’t have a death certificate, look for a gravestone. And if you are feeling charitable, then take a trip to your local cemetery and start taking pictures to help other people on their way to finding their ancestors.

Back to Basics · tips and tricks

Census Survey: Your New Best Friend

When I first started taking family history classes, I considered the census just another record (I know, after that 1890 Census blog post, it’s hard to believe I was ever so naive). I mean, it had good information on it, but it’s not like it gave birth, marriage, or death dates. And those were obviously the most important records to find out about a person.

Was my world shaken or what?

The census is the best! That is why the fact that one of the US Censuses was burned is so absolutely depressing. We were told in our class that one of the very first things we should do when we start researching is perform a census survey. Basically, you find all of the censuses that follow the person/family you are researching from their birth to death (if you don’t know when they were born or died, you can use the censuses for the general time period that you think they lived) and take down all of the information that you possibly can glean from it. The information you get from one census can help you find them in the next census back. I recommend starting with the most contemporary census. Doing a survey can help you figure out where the family was moving, how many children there were (in the 1900 US Census it shows the number of children the woman has had and how many are still living–a great resource), where the person’s parents were from, their occupation, and even if they owned a radio (1930 US Census).

But using censuses is not all peaches and cream. There are limitations. For example, censuses have not been around since the beginning of the world. The first US Census was taken in 1790 and it doesn’t give a whole lot of information. All US censuses before 1850 only listed the head of household and the number of people in each age group.

1820 Census
ancestry.com, 1820 US Census

It’s hard to get a lot of information from that, but it can help track how many people and possible children they could have had. So even if your ancestors are back in the tough days of censuses, keep looking. The good news is that in 1850 they started listing all of the names of the people in the household and other relevant information.

1850 Census
ancestry.com, 1850 US Census

There is the sadness of the 1890 US Census, but there are about 6,000 surviving names if you are extremely lucky. Not all censuses that have ever been taken in the US are available for viewing due to privacy for people who are still living. The most current one that you can view right now is the 1940 US Census.

Where can you find censuses? They have all been digitized and indexed and are on websites like FamilySearch and Ancestry. I prefer Ancestry for census records because it seems easier to find them and they are a really great quality. But you can use either. They are also available on microfilm in select locations like the Family History Library in Salt Lake City, UT. I’m of the opinion, though, of “Why should I leave my couch?” So I look at them online. Plus, online=searchable.

If there is a census available for the country you are interested in depends on the country. A great resource to look at to find out if there is a census for a certain country is the FamilySearch Research Wiki or Ancestry’s Red Book. Pretty much if you can find reference materials for your area of study, you can try to find out when or if censuses were taken in a country.

Off the top of my head (thanks to lots of drilling in my class), the only census that we have available for Mexico is the 1930 Census and that doesn’t include the Federal District. For the British Isles, Ancestry has censuses from 1841 to 1911. They are split up into England, Wales, Scotland, and different islands.

Just be careful when searching in England and Wales Censuses because there are a lot of common names and you need to be certain that it is actually your ancestor. I found out the hard way that there are a lot of Thomas Wests in England in 1861. Trust me, a lot. Over a thousand at least. Just use other information that you have like parent’s names, average birth year, where he/she was born, that kind of thing. And that goes for all censuses, not just the ones in the British Isles.

Census surveys aren’t always the easiest, especially since different people are reporting the information, but they are a wonderful tool for starting out. Good luck with your census surveys and all of your genealogy research!